September 26, 2011

Classic Peach Pie


I hear you're getting tired of seeing the Herb Rubbed Pork from May, so I thought I would come back from my hiatus and refresh the site.

Where have I been you ask? My absence started innocently enough -- I was just busy and didn't have time to cook, photograph and blog. But then I started to enjoy making repeat dishes (which I couldn't do when I was blogging and always looking for something new) such as key lime pie, flour tortillassweet potato burritos and turkey chili soup

And finally, right when I was about to get on the bandwagon again, we moved. And this my friends, is where I am now cooking:


We call it the Cottage. It's the basement in our new home, which I'm using because we have gutted the main floor of our home (including the kitchen) to build our dream home. So I'm relegated to the downstairs, which is nothing short of uninspiring. And incredibly challenging to work in when half my kitchen tools are still packed and the fridge is in the dining room upstairs.

But I've been itching. I've wanted to cook so badly. I'm getting sick of hamburgers. So last week I bought some peaches and made two peach pies and a cobbler. Then of course, I had to make vanilla ice cream to go along with it. Sadly, in our reno, there is no great place to photograph and the weather has been drab, so I've been reliant on my iphone. I hope you'll understand and take my word that all food was not only attractive, but delicious.

So I thought I would celebrate my homecoming to the blog, with a peach pie. Classic and simple. Doable in a reno. No special ingredients required except some fresh peaches -- on-their-last-leg ripe are best. Enjoy.

And please feel free to share some easy-to-make-during-a-reno ideas. Think one pot, freezable and delicious.

Super Simple Peach Pie

Ingredients

2 flakey pie crusts
6-8 peaches (depending on size), peeled and sliced
1/2 cup sugar
4 tablespoons cornstarch
1/8 teaspoon salt
1/4 teaspoon cinnamon


Directions

Preheat oven to 425 degrees.

In a large bowl, combine the sugar, cornstarch, salt and cinnamon. Add the peaches and toss until they are evenly coated.

Lightly flour a clean counter and roll out the first pie crust. Drape over pie plate, evenly trimming the overhang to about 3/4".

Pour peaches in the pie plate on top of the first crust. (You want the peaches to mound a bit higher than the pie plate)

Lightly flour the counter again and roll out the second crust. Using a pizza roller, cut the crust into eight strips of equal width. Take every other one and lay it over the pie. Then, fold back the first and third strip and lay a fifth strip over them the other direction. Fold 1 and three back, then from the other direction, fold 2 and 4 back and lay a sixth strip over them the other direction. Repeat until strips are interwoven. Tuck in overhanging dough in pie plate and crimp with your thumb and pointer finger.

Bake in preheated oven for 25-30 minutes with a piece of tin foil loosely over the top. Then turn heat down to 350 degrees and bake for another 30 minutes until crust is brown and juices are bubbling.

Let cool for at least two hours (this will help the juices thicken).

Serve.

May 19, 2011

Herb Rubbed Pork Sirloin


I have had this pork sirloin in my freezer for awhile. But the truth is, I had no idea how to prepare it. It looked like this giant slab of meat in the package, but once I opened it, I realized that it was actually two small pieces (totaling about three pounds) and that it was a very lean, boneless piece of meat. I was making this for a Sunday night dinner and wanted to do something fairly simple so I prepared a simple herb rub for it. 

All I did was cover the meat in the rub, threw it in my new cast iron pot, and let it cook for an hour and a half. The meat came out tender and moist and while it was resting, I made a quick gravy from the drippings by simply adding some flour to it and whisking while it bubbled until it thickened. The great thing about the gravy was that it really had a lot of the herb rub flavouring in it so a nice addition to the meat. 

The only thing is that I found this to be a little on the spicy side with the cayenne,  so if you don't like your food too hot, you might want to reduce it a smidge. 

Herb Rubbed Pork Sirloin
Serves 4-6

Ingredients
  • 1 3 lb sirloin tip roast (pork or beef)
  • 4 garlic cloves, minced
  • 1/2 small onion, minced
  • 2 tbsp paprika
  • 1/2 tsp kosher salt
  • 1/2 tsp ground black pepper
  • 1 tsp ground cayenne pepper
  • 1 tsp dried oregano
  • 1 tsp dried thyme
  • 2 1/2 tbsp olive oil


Directions
  • In a small bowl, mix the the garlic, onion, all the spices and the olive oil and allow the mixture to sit for about 15 minutes.
  • Preheat the oven to 350 degrees and place the roast in an oven safe pot or roasting pan.
  • Roast about 1 hour and 30 minutes or to a minimum internal temperature of 145 degrees. Let sit 15 minutes before slicing. 
Recipe from www.allrecipes.com 

May 15, 2011

Simple Chocolate Ice Cream


Since spring has sprung here in Toronto (though it's currently being diluted with rain), I pulled out the ice cream maker I got for Christmas, from the depths of our storage locker. Admittedly, when I opened said Christmas present, I was a little disappointed since I'm not a huge ice cream eater. I like the odd cone once in a while, but had never considered making my own to satisfy those fleeting cravings. T had been challenging me to use the machine for a few months though, since space in our condo is at a premium, every kitchen appliance must be essential, so I finally cracked the box open and pulled out the recipe book.

I was immediately impressed by the variety of recipes -- coffee butter almond ice cream, pumpkin pie ice cream, mango gelato, cranberry sorbet -- but I always like to start simple so I opted for the Simple Chocolate Ice Cream. 

As I've mentioned, one of the things I love most about cooking is knowing and controlling what's going into my food. Though sometimes I prefer to be in denial. If knowing that ice cream is made solely from cream and sugar will cause you to faint, do not read any further. But with good quality and simple ingredients, you get a good quality dessert and this ice cream was nothing short of that. It literally melts on your tongue and it's so rich (not surprisingly) that you really only need a small serving to satisfy that sweet tooth craving. 

So, I am sure the ice cream maker sees a number of recipes this summer. In fact, the bowl is in the freezer right now just waiting to be used, so please, if you have a good recipe I should try, let me know! For now, here's a delicious one to kick off your summer.

Simple Chocolate Ice Cream
Makes 14 1/2 cup servings

Ingredients
  • 1 cup unsweetened cocoa powder
  • 2/3 cup sugar
  • 1/2 cup firmly packed brown sugar
  • 1 1/2 cups whole milk
  • 3 1/4 cups heavy cream
  • 1 tsp pure vanilla extract


Directions
  • Place the cocoa and sugars in a medium bowl and stir to combine. 
  • Add the whole milk and use a hand mixer on low speed to combine until the cocoa and sugars are dissolved. 
  • Stir in the heavy cream and the vanilla.
  • Turn machine on and pour mixture into freezer bowl and let mix until thickened, about 25 to 35 minutes. 
  • If you want a firmer consistency, place in an airtight container for about two hours. 


April 21, 2011

Lime Chicken Soft Tacos


One of the biggest kitchen challengs I have is how to dress up chicken. I wanted to use the flour tortillas I made, but since they were sort of time consuming, I was looking for quick to make with them. Months ago when I realized how much I loved Mexican, I tagged a recipe for lime chicken from http://www.allrecipes.com/ that fit the bill perfectly. 

This chicken was easy, refreshing and the lime added a nice light flavour to a simple meal. And, while this isn't how I made them, I bet it would be easy to let the chicken marinate all day in the sauce and then quickly cook them up when you got home from work for a fast and healthy weeknight meal.

Lime Chicken Soft Tacos
Makes 8-10 

Ingredients
  • 4 skinless, boneless chicken breasts, cubed
  • 1/4 cup red wine vinegar
  • 1 lime, juiced
  • 2 tsp white sugar
  • 1 tsp salt
  • 1 tsp black pepper
  • 4 green onions, chopped
  • 4 cloves garlic, minced
  • 1 tbsp cilantro, chopped
  • 10 6" flour tortillas
Directions
  • In a medium bowl, combine vinegar, lime juice, sugar, salt, pepper, green onion, garlic and cilantro.
  • Saute chicken in a medium saucepan over medium-high heat until no longer pink, about 10-12 minutes.
  • Add vinegar mixture and simmer for an additional 10 minutes.
  • Serve lime chicken in warm tortillas topped with tomatoes, lettuce, cheese, salsa and sour cream.
Recipe adapted from All Recipes


April 16, 2011

Flour Tortillas


I have been busy. Two of my girlfriends have gotten married, we're down people at work so I've been swamped and T had knee surgery. So I've been out of the kitchen and eating a lot of cereal (hardly blog worthy!). But I've missed it like crazy. I've missed having down time and being alone in the kitchen, so as soon as I found some time, I made these tortillas. I knew they would take some time to make, but it was easy work and well worth the effort. 

The difference between these and the store-bought kind is unbelievable. These were warm, delicious, endearingly individual looking (i.e. not uniform -- at all), a just incredibly fresh tasting. I wouldn't make these all the time, and they would work better as a taco shape over a burrito, but boy they were good.

You can put whatever you want in them, but stay tuned to see what I filled these up with!

Flour Tortillas
Makes 14-16 tortillas

Ingredients
  • 2 1/2 cups flour
  • 2 1/2 tsp baking powder
  • 1 tsp kosher salt
  • 1/2 cup + 2 tbsp lard
  • 1 cup hot water
Directions
  • Combine flour, baking powder and salt in a large bowl and mix.
  • Add the lard and use a pastry cutter to combine the ingredients until they look like coarse crumbs.
  • Slowly pour in the hot water, stirring to bring the mixture together. Lightly knead the dough 30 to 40 times until it becomes a cohesive ball and becomes less sticky (this will happen the more you knead).
  • Roll into ping pong sized balls, place on a tray, cover with a tea towel and let rest for about 30 minutes.
  • When you're ready to make the tortillas, heat a dark or cast iron griddle to medium - medium high heat. 
  • One by one, roll out the balls of dough until very, very thin. Place one at a time on the griddle and cook on each side for about 20-30 seconds. You'll know to flip because large bubbles will form on the side. Flip and then remove from the heat once the tortillas are still soft but are slightly brown in spots. 
  • Remove and stack tortillas as you cook them, covering with a tea towel to keep them warm.
Recipe from The Pioneer Woman


March 23, 2011

Sweet Potato Burritos


We have all been told to never judge a book by its cover. Well, I'm learning to not judge a recipe by its title. 


As a newish cook, I still find it difficult to read through a recipe and have a really good sense of what it's going to taste like. So when I saw the title, Addictive Sweet Potato Burritos, I wasn't sold. I couldn't get my mind to understand what the combination of sweet potatoes and beans (and mustard?!) would be like, but how could 1,218 people who gave it 4.5 stars on www.allrecipes.com, be wrong? Well, they weren't.


In just three short weeks, we've made this three times. It is so good, I can't even begin to explain it. The sweet potato doesn't have a very powerful flavour and while it adds more than just being a filler, it doesn't compete with the beans. And the best part is that this dish is screaming healthy. I mean, sweet potatoes and beans and spice? If I didn't douse these in sour cream, we'd be looking at a serious health food here. 


So now you have it. Sweet potatoes and beans = a match made in heaven. 


Sweet Potato Burritos
Makes 12 large burritos
Printable Recipe


Ingredients

  • 1 tbsp butter
  • 1 onion, chopped
  • 4 cloves garlic, minced
  • 2 cans black beans, drained
  • 1 can kidney beans, drained
  • 2 cups water
  • 3 tbsp chili powder
  • 2 tsp ground cumin
  • 4 tsp prepared mustard
  • 1 pinch cayenne pepper
  • 3 tbsp soy sauce
  • 4 cups sweet potatoes, cooked and mashed (boiled or roasted)
  • 12 10" flour tortillas
  • 3/4 cup shredded cheddar cheese


Directions

  • Preheat oven to 350 degrees.
  • In a large bowl, combine the black beans and kidney beans and roughly mash.
  • Heat butter in a medium saucepan and saute onion and garlic until soft. Stir in beans and gradually stir in water -- you want them to be thick still and not too runny so you might not need as much as 2 cups of water.
  • Remove bean mixture from heat and stir in chili powder, cumin, mustard, cayenne pepper and soy sauce.
  • Warm stack of tortillas in the microwave for 45 seconds to make pliable.
  • Divide bean mixture and mashed sweet potatoes evenly between tortillas. Top with cheese and roll tortilla and place seam side down in a baking pan. 
  • Bake for 12-15 minutes until slightly browned.
  • Serve with salsa and sour cream.


March 17, 2011

Oven-Baked Bacon


Bacon is one of my weaknesses. For years, I was a vegetarian, but secretly, on Saturday mornings when T and I would go out for breakfast, I would indulge in a few strips of bacon. There's something about the saltiness of it that I crave and it just completes a Saturday morning breakfast.

But no matter how much I loved bacon, I rarely made it myself. I found it super messy and I hated that hot oil always popped up and burned me and covered my stove top. Baking my bacon though has changed all of this. It is a foolproof way to cook bacon and I always  have perfectly cooked, non-curly bacon that has an easy clean up. The other great thing is that it is one less thing I have to watch on the stove when I am making eggs, pancakes and vegetables. 

Oven-Baked Bacon

Ingredients
  • strips of your favourite bacon
Directions
  • Line a baking sheet with tinfoil and place a cooling rack on top.
  • Lay strips of bacon out on cooling rack in a single layer and put in centre rack of oven. Turn oven on to 400 degrees (do not preheat) and bake for 18-20 minutes or until bacon has reached desired crispness.
  • Remove tray from oven and transfer bacon strips to a plate lined with paper towels to remove excess grease.

March 14, 2011

Thank You!


A few weeks ago, Ann from Apples and Twinkies awarded me with a Stylish Blog award and I have also been honoured by Stephanie at The Starving Artist with a Lovely Blog award. What a treat and an honour for my little blog! 


Ann has been one of my most regular followers and her constant comments have been a huge boost for me. She has a wonderful blog with lots of great recipes, so go check her out. Stephanie is a relatively new food blogger but she always has amazing recipes with a neat take on presentation, which I love.

As part of these awards, I am supposed to tell you seven things about myself, and direct you to a few of the new blogs I have found. So here goes:


Seven things about me:


1. I have an adorable puggle -- pug x beagle cross -- named Cooper.


2. I have been a Toastmaster for 5.5 years and just last month, completed all the requirements to be honoured as a Distinguished Toastmaster, the highest honour. (Toastmasters is an international organization that promotes communication and leadership)


3. I live in Toronto where we are enjoying a lovely, snow-filled winter. (and today it's a warm and sunny 4 degrees!)


4. I still use a paper day planner and love it.


5. I read about one book per week, all taken out of the Public Library.


6. Having my nails done every week is one of my biggest luxuries.


7. The Sound of Music is my all time favourite movie. I even had a surprise Sound of Music themed wedding shower!


Some amazing blogs I have discovered over the past year:

March 7, 2011

Peanut Butter Brownies


Some things just go together. Frauline Maria and Captain Von Trapp. Crossword puzzles and pencils. Puggles and vacuums. Chocolate and peanut butter.

Last night I was craving something sweet, but being in a minor food rut, I didn't have too much in my cupboards to draw from. So I turned to Martha Stewart and her many brownie options and found just one where I had everything. And this, is how peanut butter brownies came to be.

Now, I'll tell you, there is a lot of peanut butter in these. I would argue, they are 40% peanut butter and 60% brownie, so you have to be committed to this flavour combination. I wholeheartedly am, so I proceeded and didn't look back. The result is a rich and very sweet treat, to be enjoyed with a tall glass of milk or a steaming hot cup of tea. It hit the sweet spot and then some. Even my peanut-butter loving puggle wanted some. Sorry Cooper, these are just for mom. And dad. And any guests. But not for puggles.


Peanut Butter Brownies
Makes one 9x9 pan
Printable Recipe


Ingredients


Batter
  • 8 tbsp butter, cut into small pieces 
  • 2 ounces unsweetened chocolate, coarsely chopped
  • 6 ounces semisweet chocolate, coarsely chopped
  • 2/3 cup all-purpose flour
  • 1/2 tsp baking powder
  • 1/4 tsp salt
  • 3/4 cup granulated sugar
  • 3 large eggs
  • 2 tsp vanilla extract
Filling
  • 4 tbsp butter, melted
  • 1/2 cup confectioners' sugar
  • 3/4 cup smooth peanut butter
  • 1/4 tsp salt
  • 1/2 tsp vanilla extract

Directions
  • Preheat oven to 325 degrees F. Line a 9x9 square pan with parchment paper, allowing two inches to hang over the sides. 
  • Make the batter: Put the butter and chocolate in a heatproof bowl over a pan of simmering water; stir until melted. Let cool slightly.
  • Whisk together the flour, baking powder and salt in a separate bowl and set aside.
  • Whisk the granulated sugar into the chocolate mixture. Add the eggs and whisk until the mixture is smooth. Stir in the vanilla. Add the flour mixture stirring well until incorporated.
  • Make the filling: Stir together the butter, confectioners' sugar, peanut butter, salt and vanilla in a bowl until smooth.
  • Pour one-third of the batter into the prepared pan and spread evenly with a rubber spatula. Place dollops of filling on top of the batter. Drizzle the remaining batter on top and gently spread to fill the pan. Place dollops of remaining filling on top.
  • With a butter knife, gently swirl the filling into the batter running the knife lengthwise and crosswise through the layers. 
  • Bake about 45 minutes; until a cake tester comes out with a few crumbs but is not wet.
  • Let cool slightly in the pan. Lift out brownies and let cool on a wire rack before cutting into squares.


Recipe from Martha Stewart: The New Classics

March 3, 2011

Lentil and Spinach Soup


This year, I have made my way through almost every kind of creamy soup: leek and potatobroccolitomatosquashroasted eggplantcarrotspinachcauliflower and asparagus, just to name a few. I love to stay in on a cold day and enjoy a big bowl of cream soup with crusty bread and butter. But on a recent warm day, when T and I were both bouncing back from a bug, I decided I wanted something a little fresher. 

I had printed this recipe for lentil and spinach soup a while ago and thought it might just do the trick. I had never cooked with lentils and I was surprised to learn two things about it: first, Canada is the largest export producer of lentils in the world, and second, when you cook red lentils, they get creamy and yellow.

Because of how the texture changed with the lentils, this was a thicker soup than I had anticipated. But the spinach, combined with the ginger I am pretty sure was just what the doctor ordered. I actually felt healthier after eating this soup. Enjoyed, of course, with a big loaf of crusty bread.

Lentil and Spinach Soup
Serves 6-8

Ingredients
  • 2 carrots, peeled and roughly sliced
  • 2 stalks celery, sliced
  • 2 medium onions, roughly chopped
  • 2 cloves of garlic, minced
  • 2 tbsp butter
  • 6 cups chicken stock
  • 10 ounces red lentils
  • a thumb-sized piece of fresh root ginger, peeled and sliced
  • 20 cherry tomatoes, halved
  • 7 ounces spinach, cleaned and torn
  • sea salt and black pepper to taste

Directions
  • Melt the butter in a large pot, add the onions, carrots, celery and garlic until the carrots have softened and the onion is translucent.
  • Add the stock to the pot, then add the lentils, tomatoes and ginger.
  • Stir the soup and bring to a boil. Once boiling, reduce heat to a simmer. Put lid on for 10 minutes or until the lentils are cooked.
  • Add spinach and cook for 30 seconds.
  • Season well with salt and pepper.
Recipe adapted from Jamie Oliver: Ministry of Food

February 26, 2011

Decadent Chocolate Pudding


Two years ago, before I started really cooking, I would have been completely satisfied ripping open a package of Jello powdered pudding, adding some milk and calling it dessert. 

Now, I'm much more interested in what I'm eating. I'm finding the more I cook, the less interested I am in pre-packaged foods. Without even thinking, I've stopped eating Kraft Dinner (which I honestly used to love), canned soup, salad dressing, pre-made oatmeal -- all in favour of making these foods myself. I enjoy knowing what's going into my food and trying to make it as fresh as possible. 

One more step in that was making this decadent chocolate pudding. Making it from scratch can't even compare to a package. The flavour is richer and more choclatey, the texture is thicker and dense. And, most surprisingly, I felt much more satisfied after a single serving than I would have with a whole box of packaged stuff (not that I ever ate a whole box...). So I'm finding that I'm not only enjoying the process of cooking more, but I am certainly enjoying the results!

What do you make from scratch that you used to buy pre-made?

Decadent Chocolate Pudding
Serves 6

Ingredients
  • 1/3 cup plus 1 tbsp cocoa powder
  • 2 tbsp cornstarch
  • 1/8 tsp salt
  • 1 cup sugar
  • 4 large egg yolks
  • 2 1/2 cups milk
  • 1/2 cup heavy cream
  • 1/2 tsp vanilla extract
  • 4 ounces semi-sweet chocolate, finely chopped


Directions
  • In a medium bowl, sift together the cocoa, cornstarch and salt. Stir in the sugar. Add the egg yolks and pour in 1/2 cup of milk. Whisk until combined.
  • In a medium saucepan, heat the remaining two cups of mils and the heavy cream over medium heat until the mixture just comes to a boil. Slowly whisk the milk mixture into the cocoa mixture.
  • Rinse out the saucepan (but don't dry to avoid scorching) and return custard mixture to the saucepan over medium-low heat. Stir in the vanilla. Stir constantly with a wooden spoon, cook until the custard has thickened slightly (Martha said until about the consistency of mayonnaise, but mine never got that thick and turned out great). Do not let it boil and don't worry if lumps form.
  • Pour the custard through a fine sieve into a clean bowl. Add the chopped chocolate in two batches, stirring until thoroughly melted after each addition.
  • Divide the pudding among six ramekins, cover with plastic wrap and chill at least four hours or overnight before serving. 
  • Garnish with whipped cream if desired.
Recipe from The Martha Stewart Living Cookbook: The New Classics

February 21, 2011

Chicken Enchiladas


I don't eat a lot of ethnic food and have a real aversion to spice (though I am working on it!), but I do love Mexican. I discovered it when we were on our honeymoon and have always been keen to make things on my own so I can moderate the spice to my palate.


This recipe was the perfect one to fill a Sunday afternoon, and it is a lengthy one, but well worth it. I used a whole roast chicken and made it the day before, so it cut down a little bit on the time. But I do like being in the kitchen for a few hours, just focusing on the ingredients. Nowhere else does time fly like it does in the kitchen. I blinked and I was putting these little guys in the oven and 40 minutes later I was enjoying them slathered with sour cream -- as all spicy food should be. 


These enchiladas were a real hit. Find the time and go make them. You'll thank me, for sure.


Chicken Enchiladas
Serves 4-6

Ingredients
  • 1 medium onion, chopped fine
  • 1 tsp oil
  • 3 cloves garlic, minced
  • 3 tsbp chili powder
  • 2 tsp cumin
  • 1 tbsp sugar
  • 1 (15 oz) can tomato sauce
  • 1 cup water
  • 1 tomato, seeded and chopped
  • salt and pepper
  • 1 cooked roasted chicken, shredded 
  • 1 cup shredded sharp white cheddar cheese
  • 1 cup shredded monteray jack cheese
  • 1/2 cup minced fresh cilantro
  • 12 soft tortillas


Directions
  • Heat the oil in a large saucepan over medium heat ad cook the onion for a few minutes until translucent. Stir in garlic, chili powder, cumin and sugar, a cook a few seconds. Mix in the tomato sauce, water and chopped tomato. Bring the sauce to a simmer, lower the heat and cook until slightly thickened, about five minutes.
  • Strain the sauce through a large mesh strainer in to a medium bowl, pressing down to extract as much liquid as possible. Transfer the reserved solids to a large bowl and set aside. Season the sauce (the liquid that was squeezed out) with salt and pepper. This is the enchilada sauce.
  • Add the shredded chicken to the bowl with the onion and tomato mixture. Add in a 1/4 cup of the enchilada sauce, 1/2 a cup each of the shredded cheeses and the cilantro. Stir to combine.
  • Preheat the oven to 425 degrees. Oil a 9 x 13" baking dish with cooking spray. 
  • Stack the tortillas on a plate and microwave for 45 seconds until warm and pliable. Spoon 1/3 cup of the chicken mixture in the centre of the tortilla. Roll up the tortilla around the filling tightly and place in the prepared baking dish, seam side down. Repeat with the remaining filling and tortillas.
  • Place baking dish in the oven uncovered for 7 minutes until start to brown slightly.
  • Reduce the oven temperature to 400 degrees. Remove the enchiladas from the oven and pour the sauce over the top and sprinkle with the remaining cheeses. Cover the dish with foil and bake for 20 minutes.
  • Remove the foil and bake for another five minutes, until the cheese is browned.
  • Let stand 10 minutes before serving.  

Recipe adapted from Annie's Eats

February 17, 2011

Carrot Cupcakes


It has been one busy couple of weeks! I feel like I have had absolutely no time to sit down, let alone cook and blog. I got into a bit of a food rut too -- I have been eating a lot of cereal and scrambled eggs. Yikes. I think I had a bit of February blues, but these carrot cupcakes were just what the doctor ordered.

I needed something that would get me back in the kitchen, that was sweet and satisfying, that was relaxing and easy to make. These hit all the marks. I can't even begin to tell you how delicious the icing is, too. It's a thick cream cheese icing and it's so amazing. The best part? The recipe makes lots so you can slather it on thick and still have enough to lick off the back of your spoon. After all, that's the best part, no?

Carrot Cupcakes
Serves 12

Ingredients

Icing
  • 1/2 pkg (4 ounces) cream cheese, softened
  • 1/4 cup butter, softened
  • 1/2 tsp vanilla
  • 2 cups confectioners' sugar
  • 1 tbsp heavy cream
Cupcake
  • 2 eggs, lightly beaten
  • 1 1/2 cups white sugar
  • 1/3 cup brown sugar
  • 1/2 cup vegetable oil
  • 1 tsp vanilla
  • 2 cups shredded carrots
  • 1 1/2 cups flour
  • 1 1/4 tsp baking soda
  • 1/2 tsp salt
  • 1 1/2 tsp ground cinnamon
  • 1/2 tsp ground nutmeg
  • 1/4 tsp ground ginger
  • 1 cup chopped walnuts

Directions
  • Preheat oven to 350 degrees. Put cupcake liners in 12 muffin cups.
  • In a bowl, beat together the eggs, white sugar and brown sugar and mix in the oil and vanilla. Fold in the carrots. 
  • In a separate bowl, mix in the flour, baking soda, salt, cinnamon, nutmeg and ginger. 
  • Mix the flour mixture into the carrot mixture until evenly moist. Fold in 1/2 cup of walnuts. 
  • Bake 25 minutes or until a toothpick inserted in the centre of a muffin comes out clean. Let cool completely.
  • Meanwhile, beat together the cream cheese and butter until smooth. Mix in vanilla and gradually beat in confectioners' sugar until the mixture is fluffy. Mix in heavy cream. 
  • Ice each cupcake and sprinkle with remaining walnuts.
Recipe adapted from All Recipes


February 8, 2011

Roasted Carrot Soup


I have been roasting a lot of vegetables lately -- beets, brussels sprouts, peppers, garlic, Roasting makes it taste like a completely different vegetable, which was essential when I decided to make this carrot soup. Carrots are one of my least favourite vegetables. They just taste... healthy. But roasting! Oh, friends, roasting this little guys made all the difference. The soup was yummy (cream certainly didn't hurt) and refreshing. And T even said he thought he could see better.

Roasted Carrot Soup
Serves 4-6

Ingredients
  • 1 medium onion, quartered
  • 2 lbs carrots, peeled and cut into two inch chunks
  • 1 belgian endive, quartered lengthwise
  • 2 tbsp olive oil
  • 1/4 tsp salt, plus more for seasoning
  • pinch of freshly ground pepper, plus more for seasoning
  • 1 bay leaf
  • 4 cups chicken stock
  • 1/2 cup heavy cream
  • 1/2 tsp grated peeled fresh ginger, or to taste


Directions
  • Preheat oven to 450 degrees. In a single layer on a cooking sheet, place the onion, carrots and endive and brush liberally with the olive oil and season with salt and pepper. Roast the vegetables until they are deep golden brown, about 30 minutes.
  • Transfer all the vegetables to a large saucepan and add the bay leaf and the stock. Bring to a simmer and cook until the carrots are very soft, about 30 minutes. Let cool slightly, discard the bay leaf, and puree the vegetables until smooth (with an immersion blender or a regular blender).
  • Add the cream, season with salt and pepper and stir in the ginger. 


Recipe from Martha Stewart, The New Classics

February 4, 2011

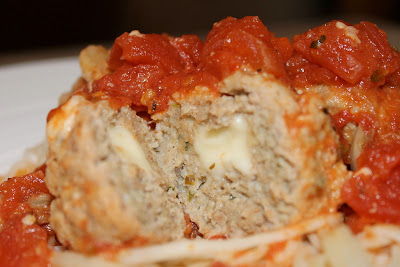
Mozzarella-Stuffed Meatballs


One of the things T is constantly asking for is meatballs. As I am always looking for new recipes, I'm reluctant to do repeats, but then I found this recipe for stuffed meatballs. What could be better than a surprise of cheesy goodness inside a meatball? I made these extra large and served them over a bed of fresh pasta and they were devoured. If there were any left, I know that they would reheat well, too.


Mozzarella-Stuffed Meatballs
Serves 5
Printable Recipe

Ingredients

  • 1/4 cup bread crumbs
  • 1/2 cup milk
  • 1 tbsp olive oil
  • 3 cloves garlic, two smashed and one chopped
  • 2 28-oz cans crushed tomatoes
  • 1 1/2 tsp basil
  • 1 1/2 tsp orgeano
  • 1 pound lean ground meat (I used turkey)
  • 2 tbsp chopped parsley
  • 1/2 cup freshly grated parmesan
  • 1 large egg
  • 4 oz mozzarella cheese, cut into 20 1/2 inch cubes
  • salt and pepper
Directions
  • In a medium bowl, soak the bread crumbs in milk
  • In a large pot, heat the olive oil over medium heat. Add the smashed garlic and cook until golden, about two minutes. Add the tomatoes, season to taste with basil, oregano and salt and let the sauce simmer over low heat.
  • To the bowl with the breadcrumbs, add the beef, chopped garlic, parsley, parmesan, egg and 1 tsp of salt. Stir until combined. Place about two tbsp of the mixture in your hand and press a mozzarella cube into the centre. Shape the meat around the cheese forming a ball. Repeat with the remaining meat and mozzarella.
  • Stir the sauce and raise the heat to medium-low. Carefully place the meatballs in the sauce, submerging them completely. Bring the sauce to a simmer and cook without stirring for 20 minutes.
  • Once the meatballs are cooked, serve meatballs and sauce over fresh pasta.
Recipe adapted from Rachel Ray Magazine

February 2, 2011

Salmon with Shallot Vinaigrette


I am always looking for easy weeknight meals to make. So, this past weekend, I culled the "weeknight meals" section of all my old Real Simple magazines and ripped out this goody. We had lots of salmon in the freezer from a large piece we got at Costco and the cut into fillets, and I had basically every other ingredient in the house with the exception of the rice vinegar. I love when things come together easily! 


This was a very simple salmon dish -- simply pan frying the salmon and topping it with a flavourful vinaigrette. Fast, easy and healthy. You could even make it faster if you had a few extra minutes earlier in the day, you could make the vinaigrette in advance.


Salmon with Shallot Vinaigrette
Serves 4
Printable Recipe


Ingredients

  • 2 small shallots, finely chopped
  • 4 tbsp rice vinegar
  • 4 tbsp chopped fresh dill
  • 4 tbsp plus one tsp olive oil
  • kosher salt and black pepper
  • 1 1/4 pounds skinless salmon fillet, cut into four pieces


Directions

  • In a small bowl, combine the shallots, vinegar, dill, 4 tbsp of olive oil and salt and pepper. Set aside.
  • Heat one teaspoon olive oil in a large non-stick skillet over medium heat. Season the salmon with salt and pepper. Cook in pan until opaque throughout, 3-5 minute per side.
  • Serve salmon with the vinaigrette on top.
Recipe from Real Simple magazine, September 2009

LinkWithin

Related Posts with Thumbnails
Web Analytics